I think I enjoy the cooking more than eating, there is nothing better than to watch the smile grow after someone’s first bite. Note from Steve: I am a flow of thought writer and apologize up front if I lose you. My family is used to it.
Place lemon, maple syrup, apple cider vinegar, and salt into the Vitamix container in the order listed and secure the lid.
Start the blender on its lowest speed, then quickly increase to its highest speed. Blend for 15 seconds.
Decrease speed to Variable 3. Remove the lid plug add olive oil through the lid plug opening. Secure the lid plug and increase the blender to its highest speed, blending for an additional 10 seconds.
This was a nice Lyn find I cut these directions in half because it was just the two of us.
Ingredients for 4
2 (6- to 8-oz.) boneless chicken breast halves, each halved horizontally
spice rub
1/2 tsp. ground black pepper
1/4 tsp. garlic powder
1/4 tsp. onion powder
For coating
1/3 cup all-purpose flour
For coating
1 large egg
1 Tbsp. water
For coasting
1 cup Italian-seasoned panko bread crumbs
1/4 cup grated Parmesan cheese
For greasing
Nonstick cooking spray
For topping
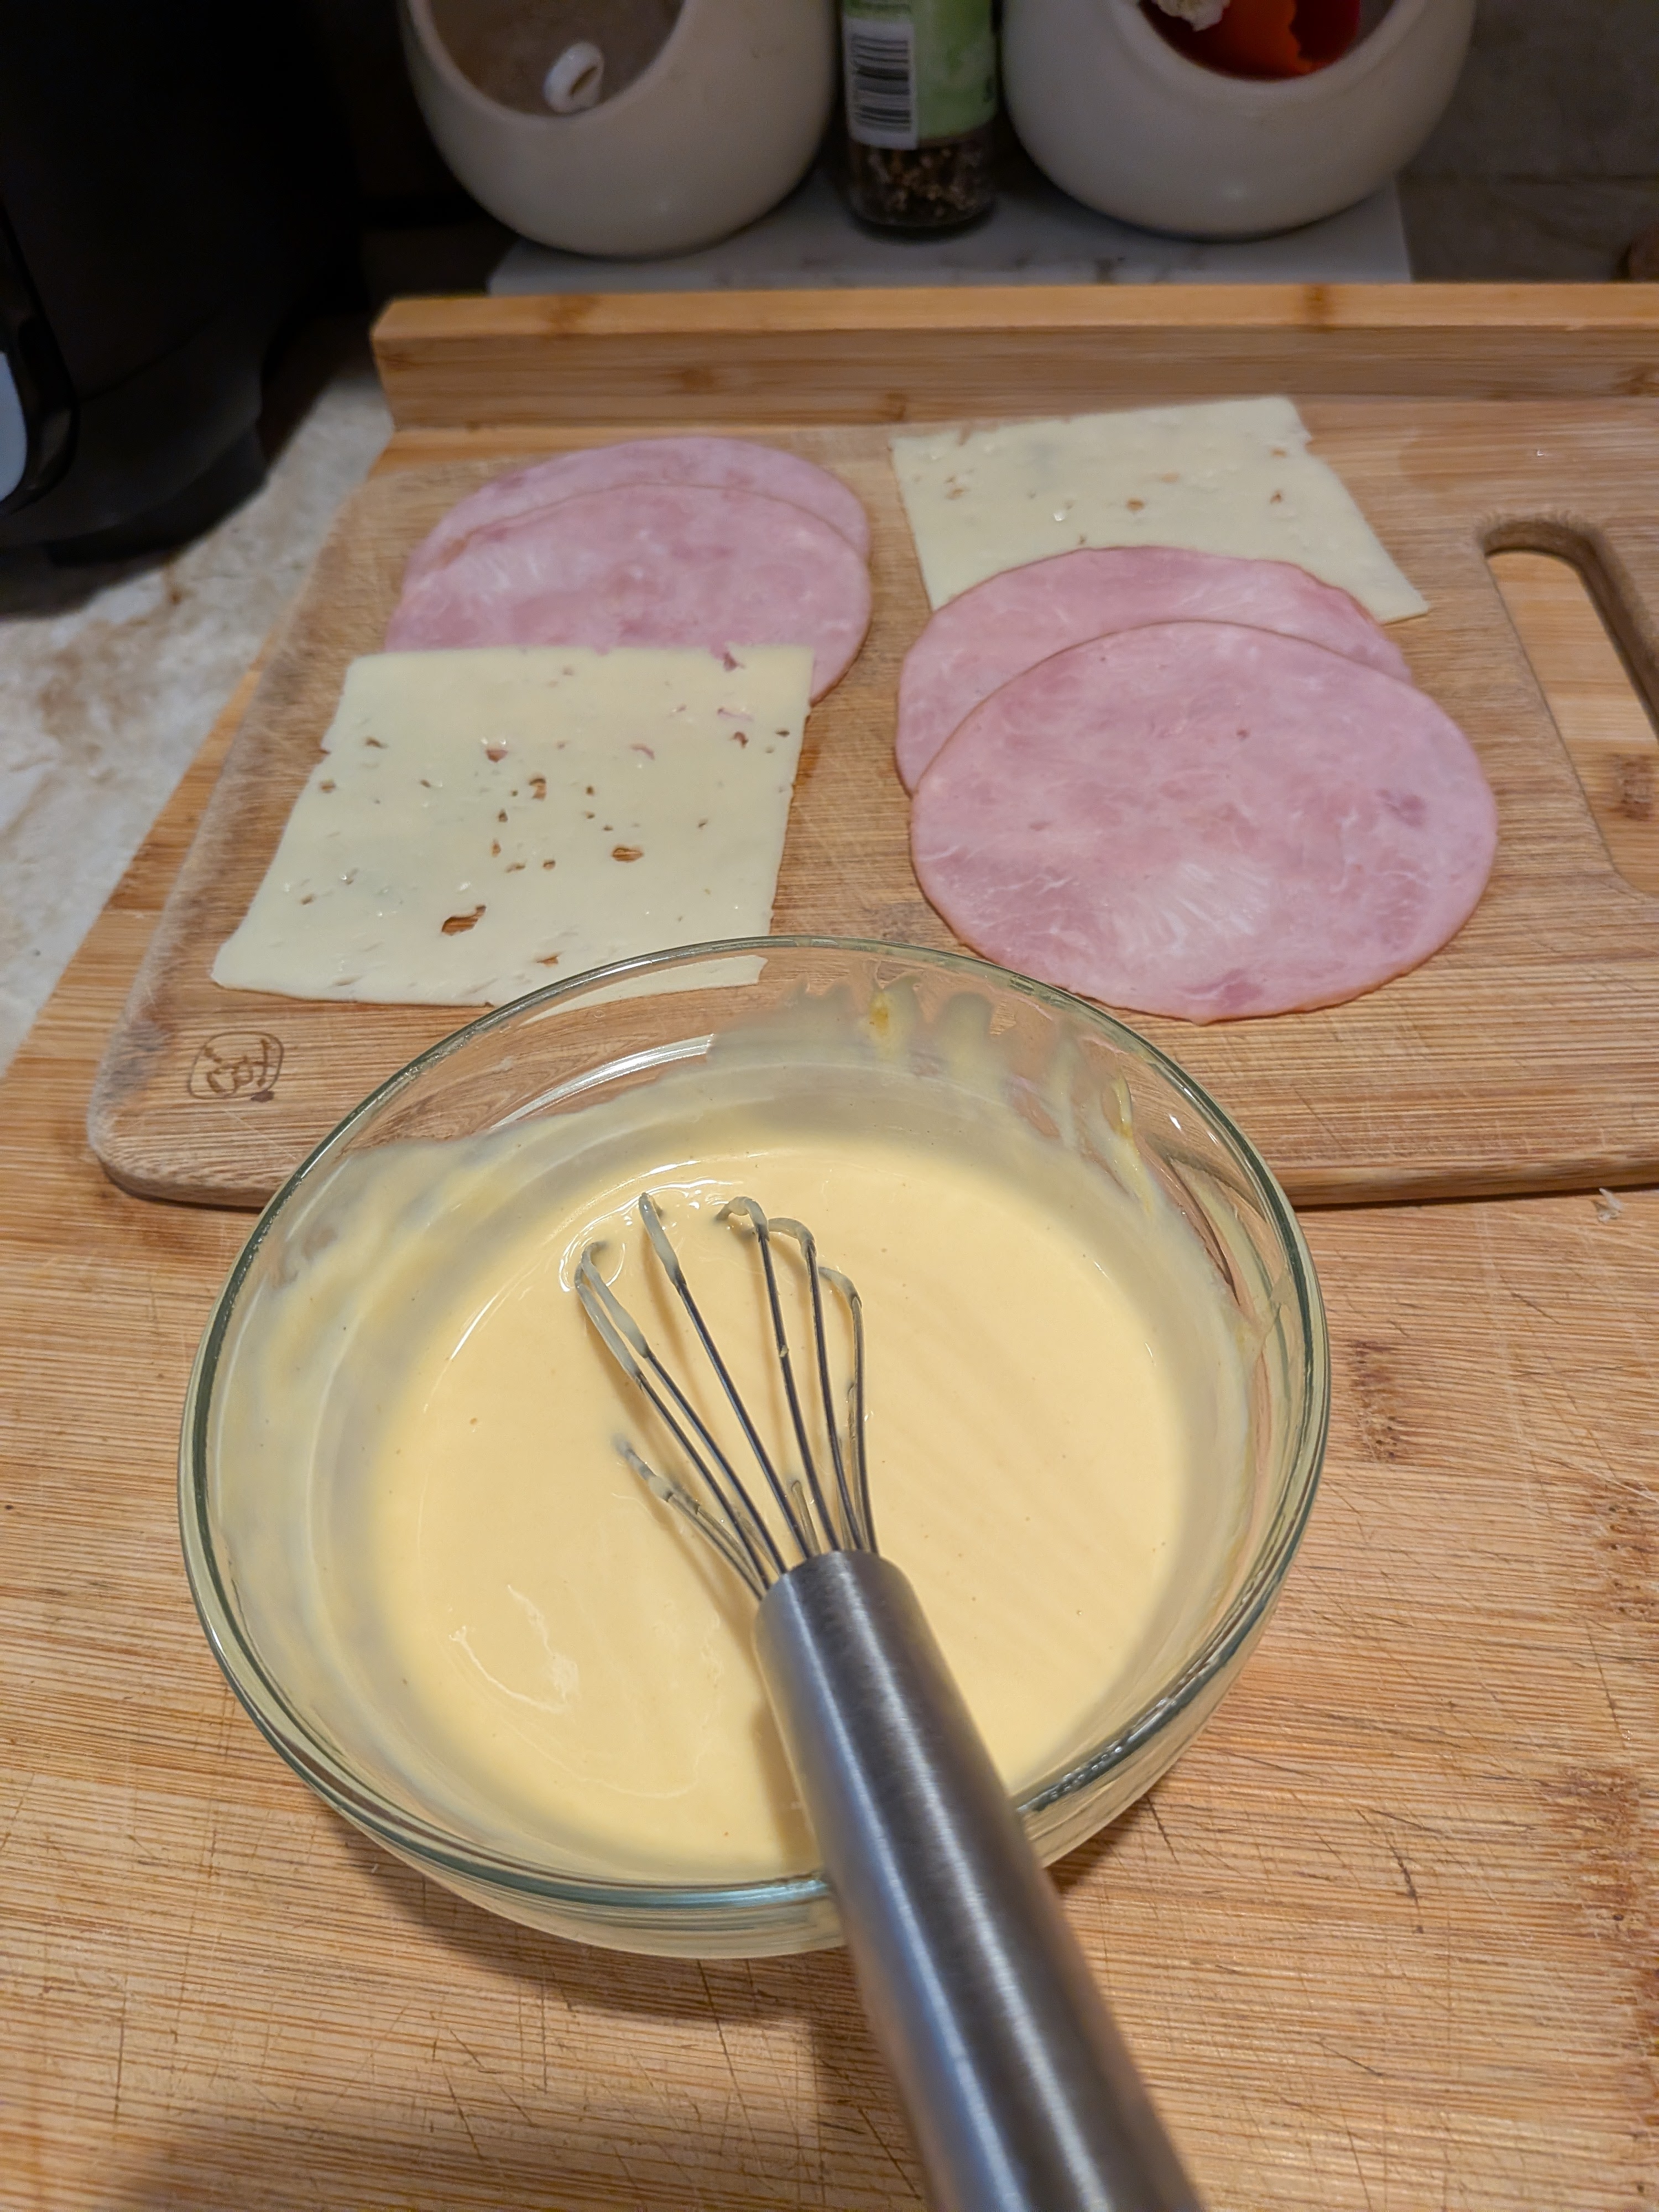
6 oz. deli ham (8 thin slices)
4 oz. Swiss cheese (4 slices)
Mustard Sauce
1/2 cup mayonnaise
1 Tbsp. Dijon-style mustard
1 Tbsp. yellow mustard
2 tsp. honey
Directions
Prep Pan
Preheat oven to 425°F. Grease a 3-qt. rectangular baking dish.
Pound Chicken
Place a chicken breast piece between two sheets of plastic wrap. On a cutting board, lightly pound with a meat mallet to even thickness. Repeat with remaining chicken breast pieces.
Make Seasoning Mix
Combine pepper, garlic powder, and onion powder in a small bowl. Sprinkle chicken pieces with seasoning.
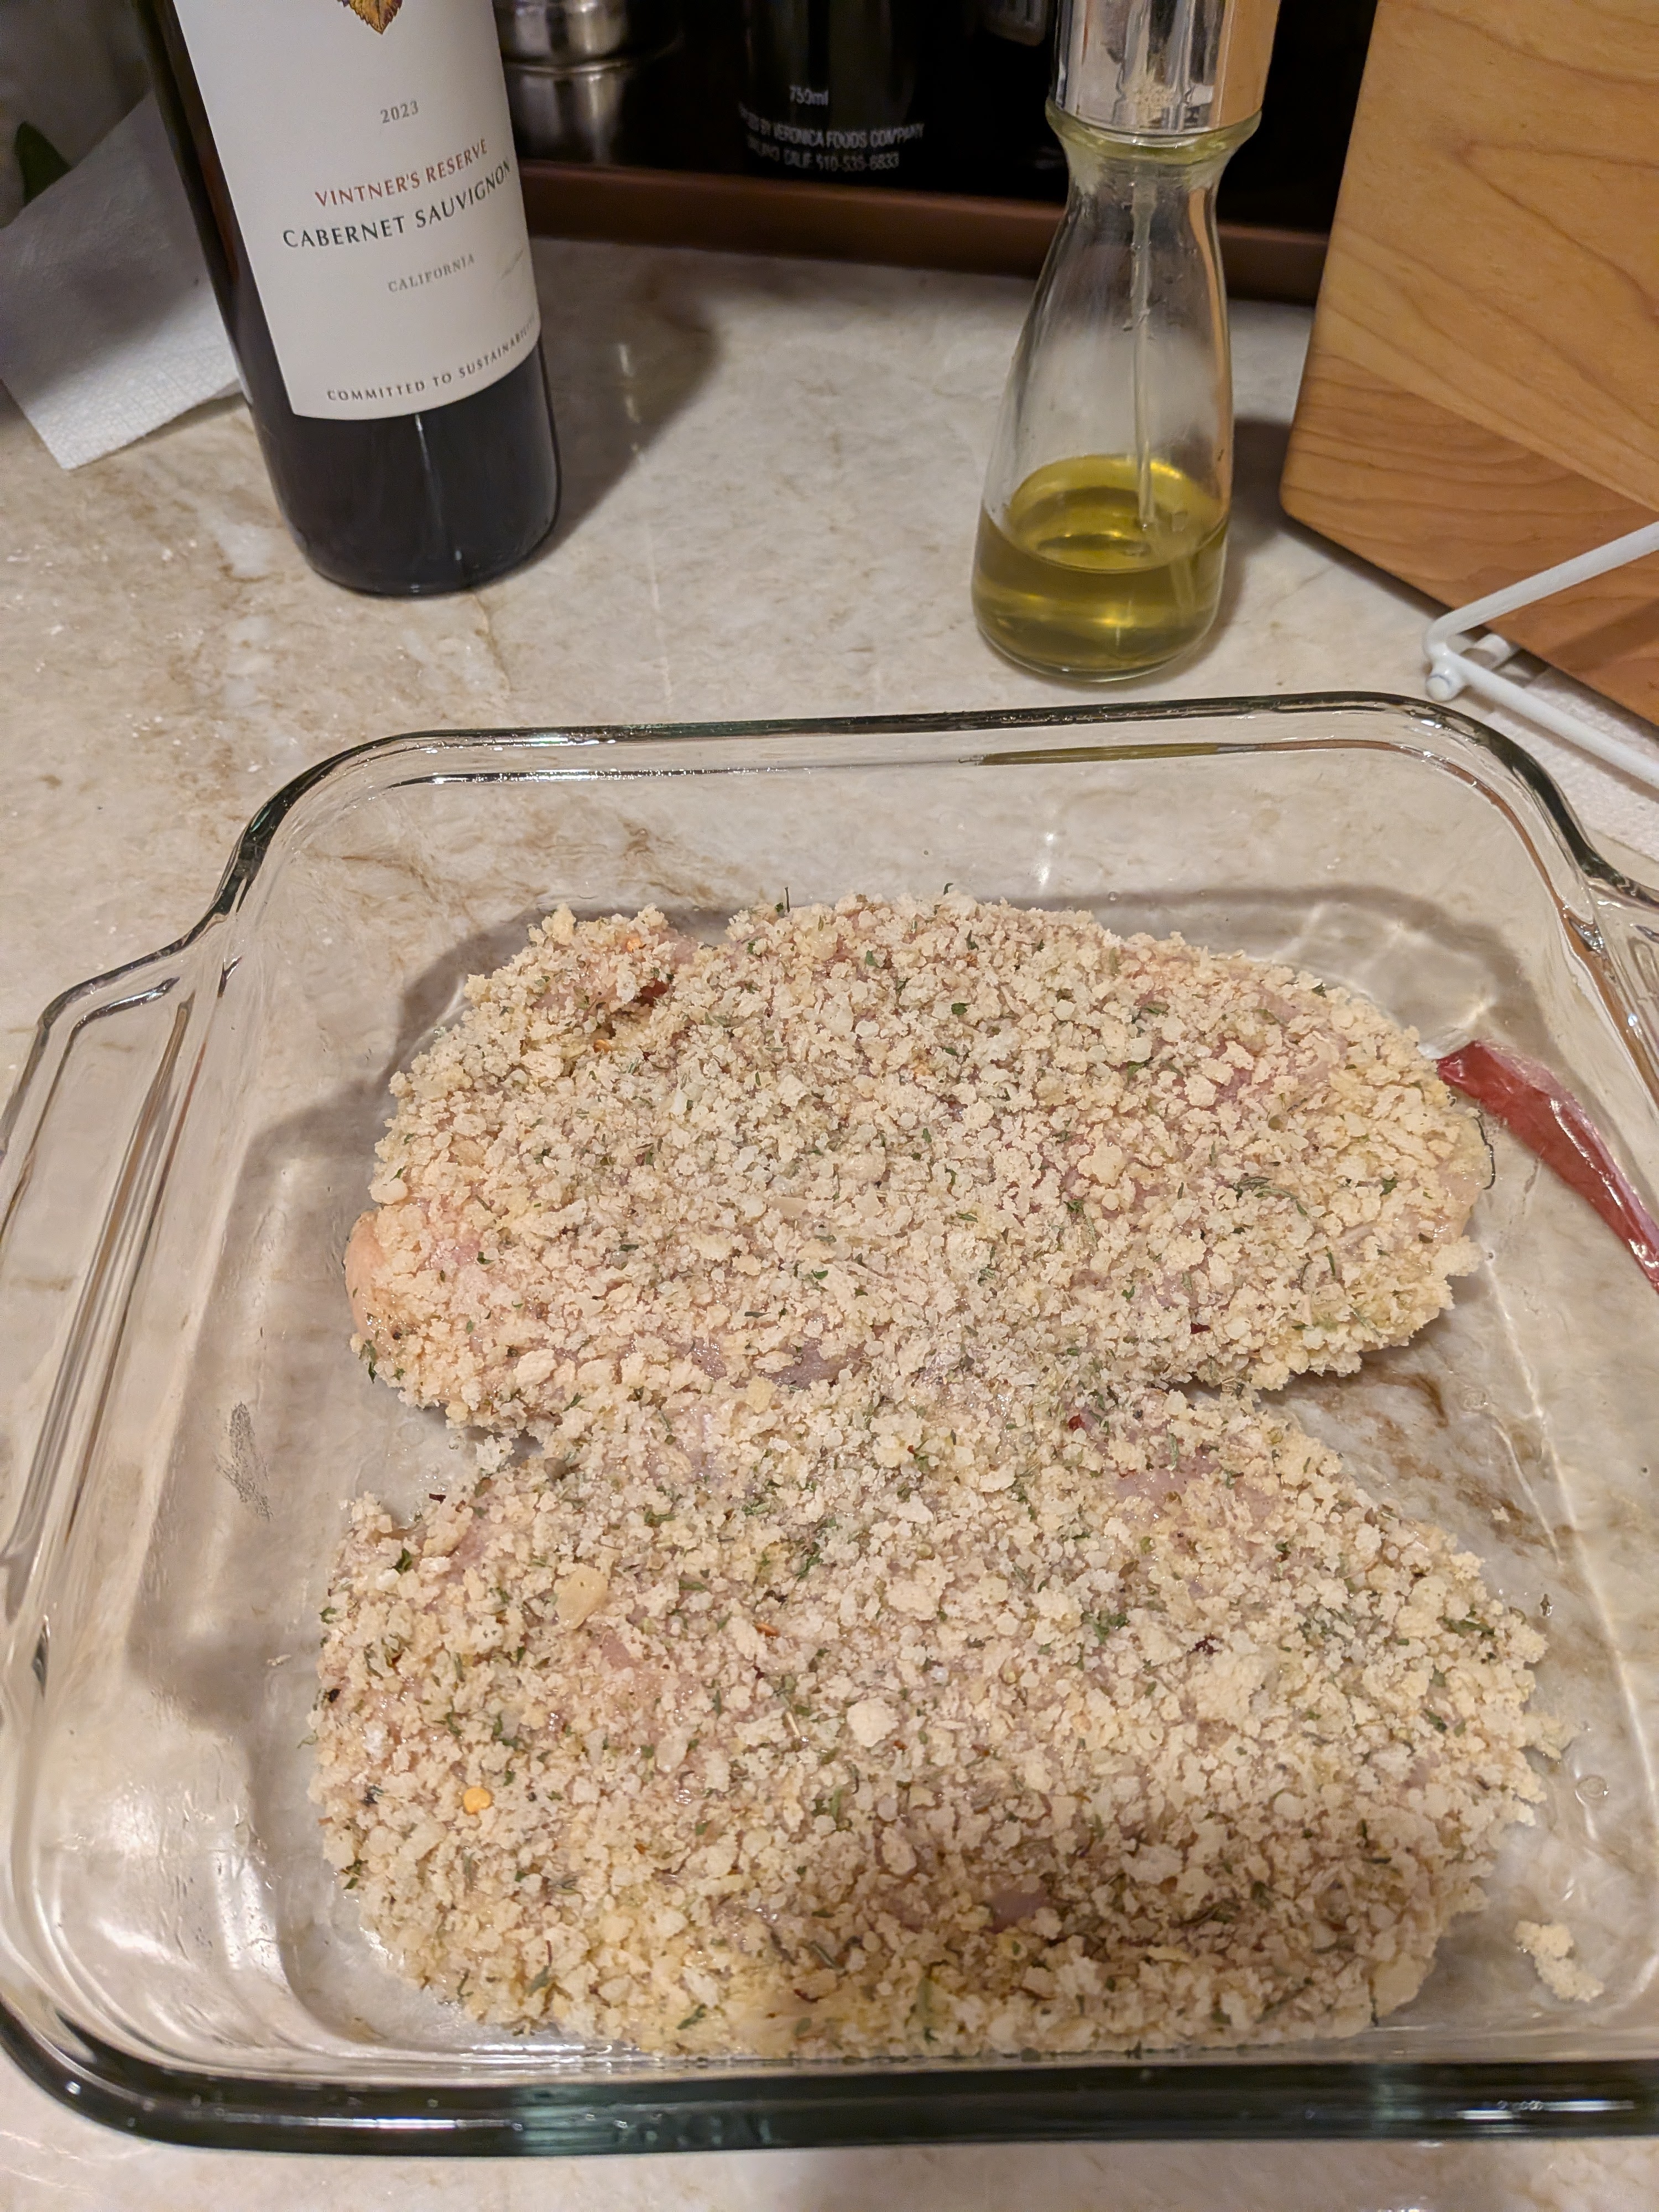
Make Coating
Place flour in a shallow dish. In another shallow dish, whisk together egg and water. Combine panko and Parmesan in another shallow dish.
Bread Chicken
Dip chicken pieces in flour, then the egg mixture, then in the panko mixture to coat, turning and pressing to stick panko mixture to chicken. Place in prepared baking dish. Coat generously with nonstick spray.
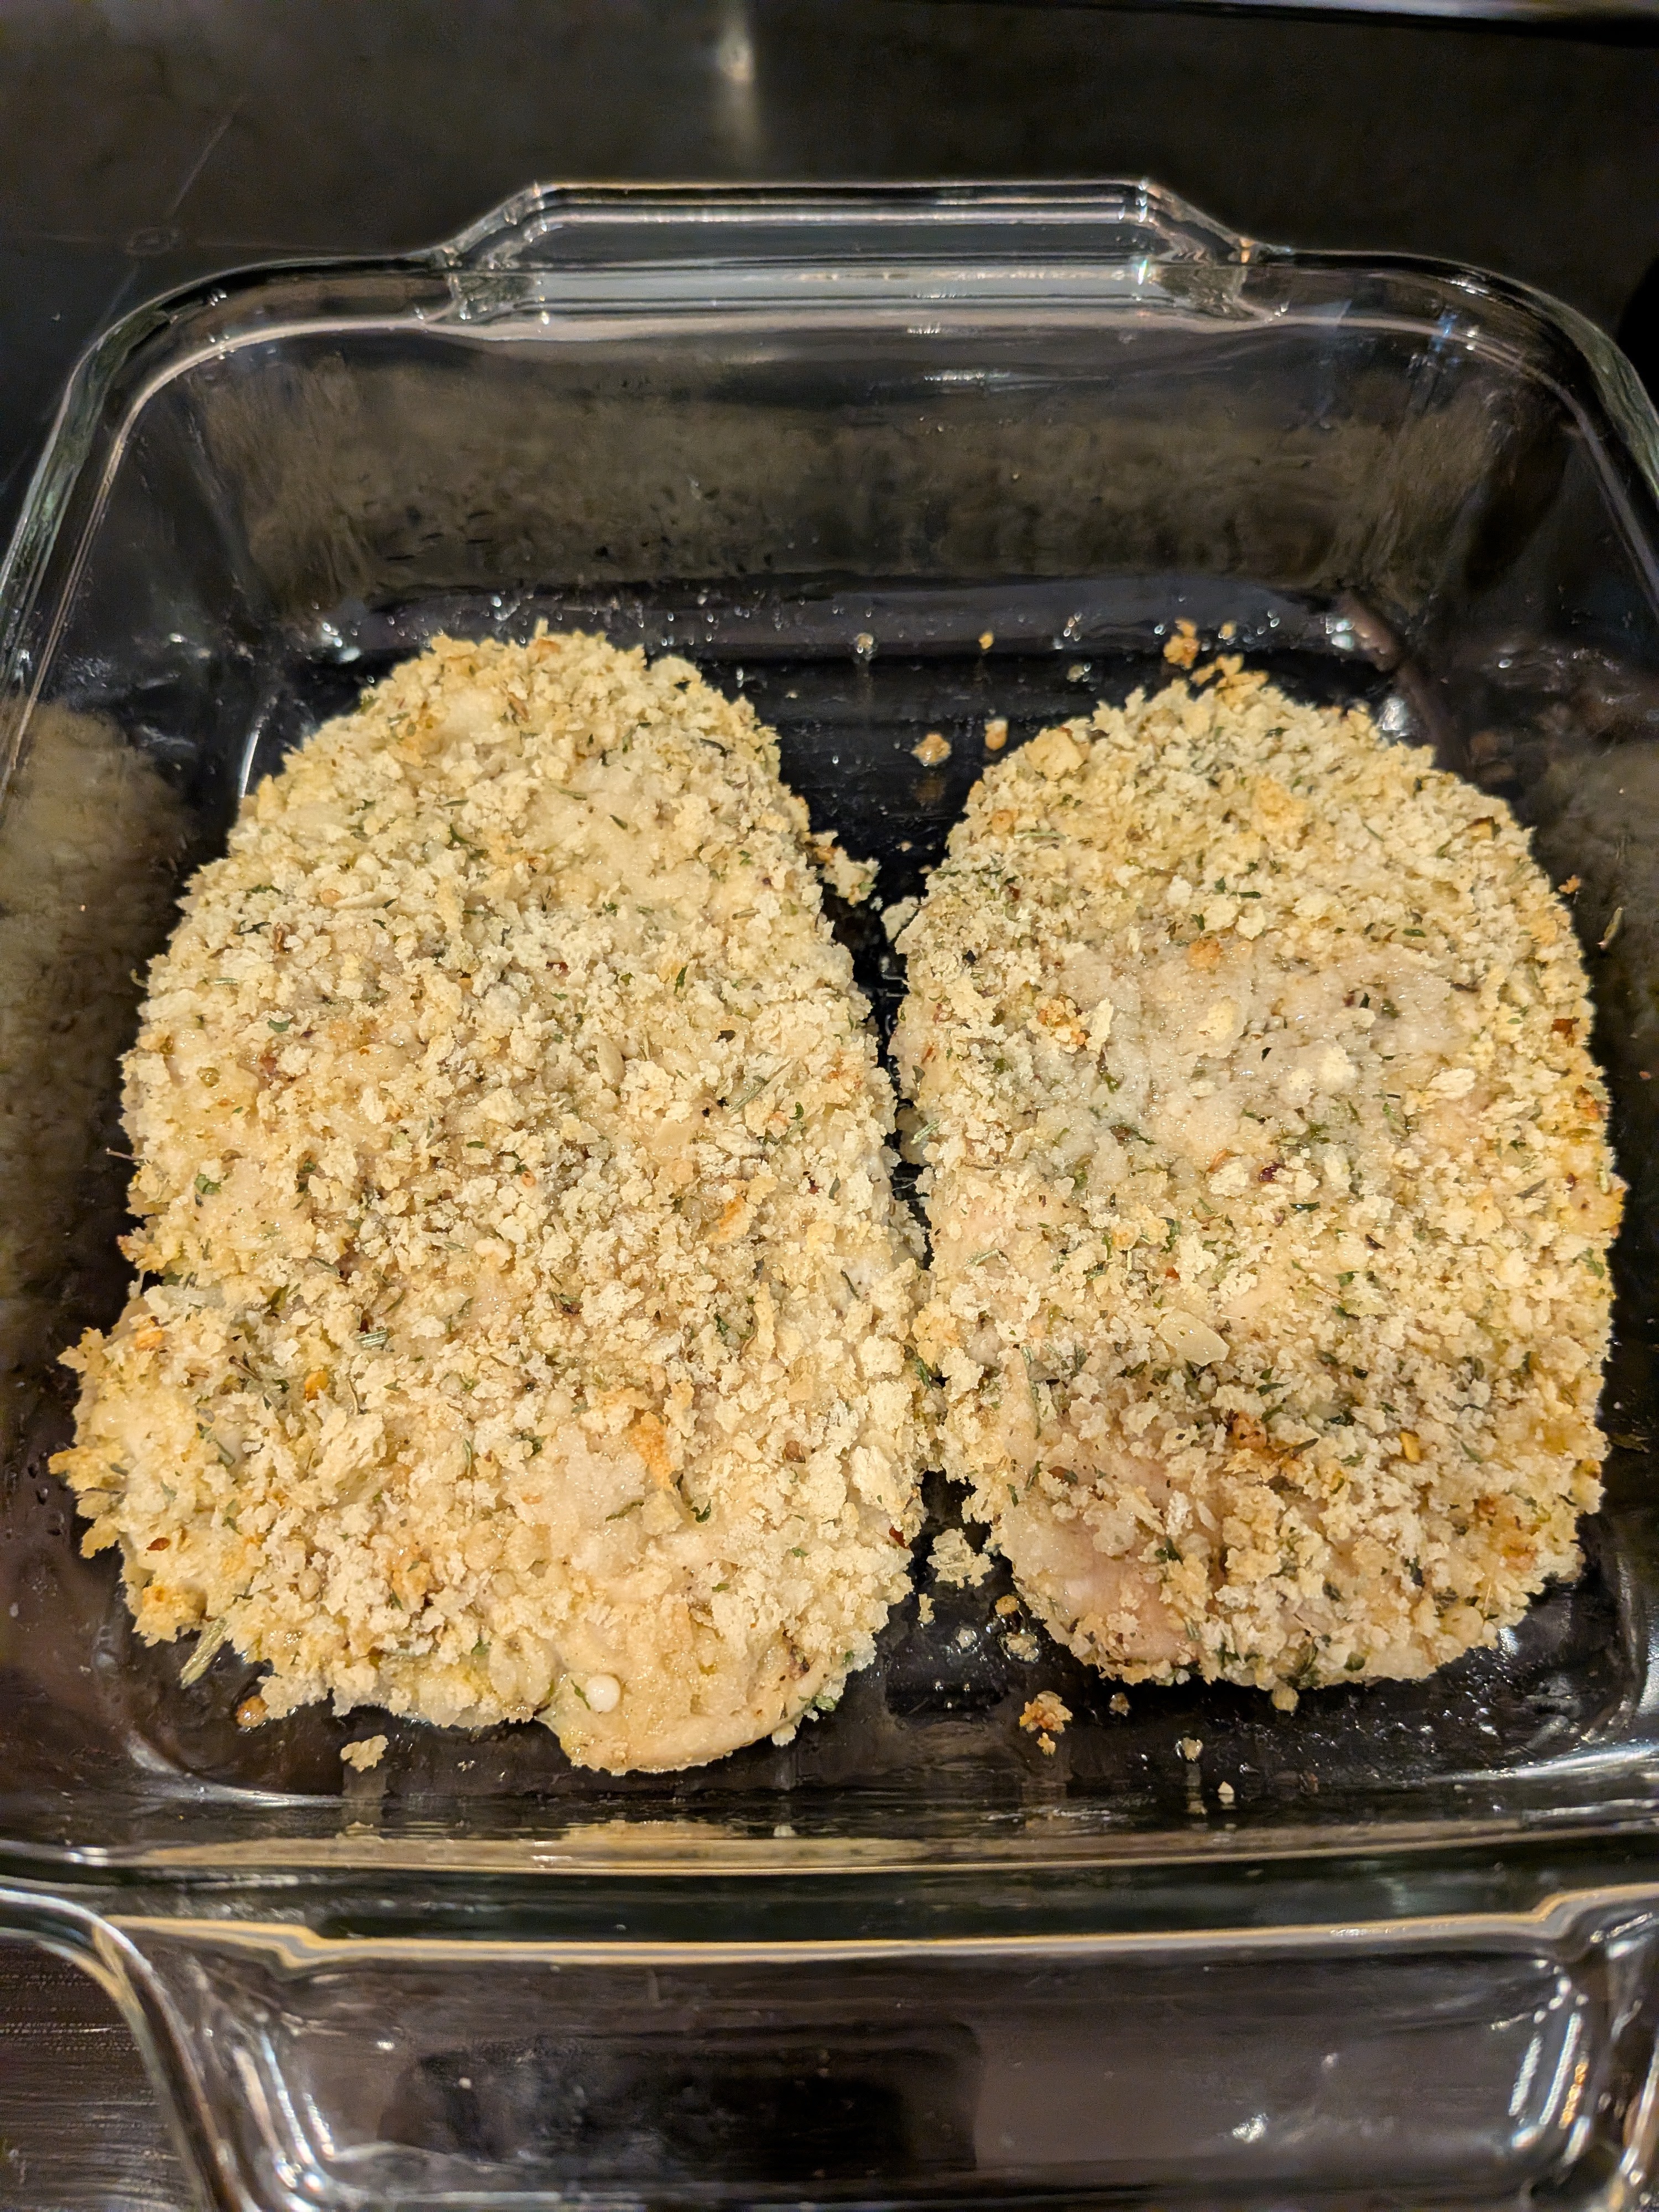
Bake
Bake 25 minutes or until golden brown and an instant-read thermometer inserted in the center registers 165°F, turning once.
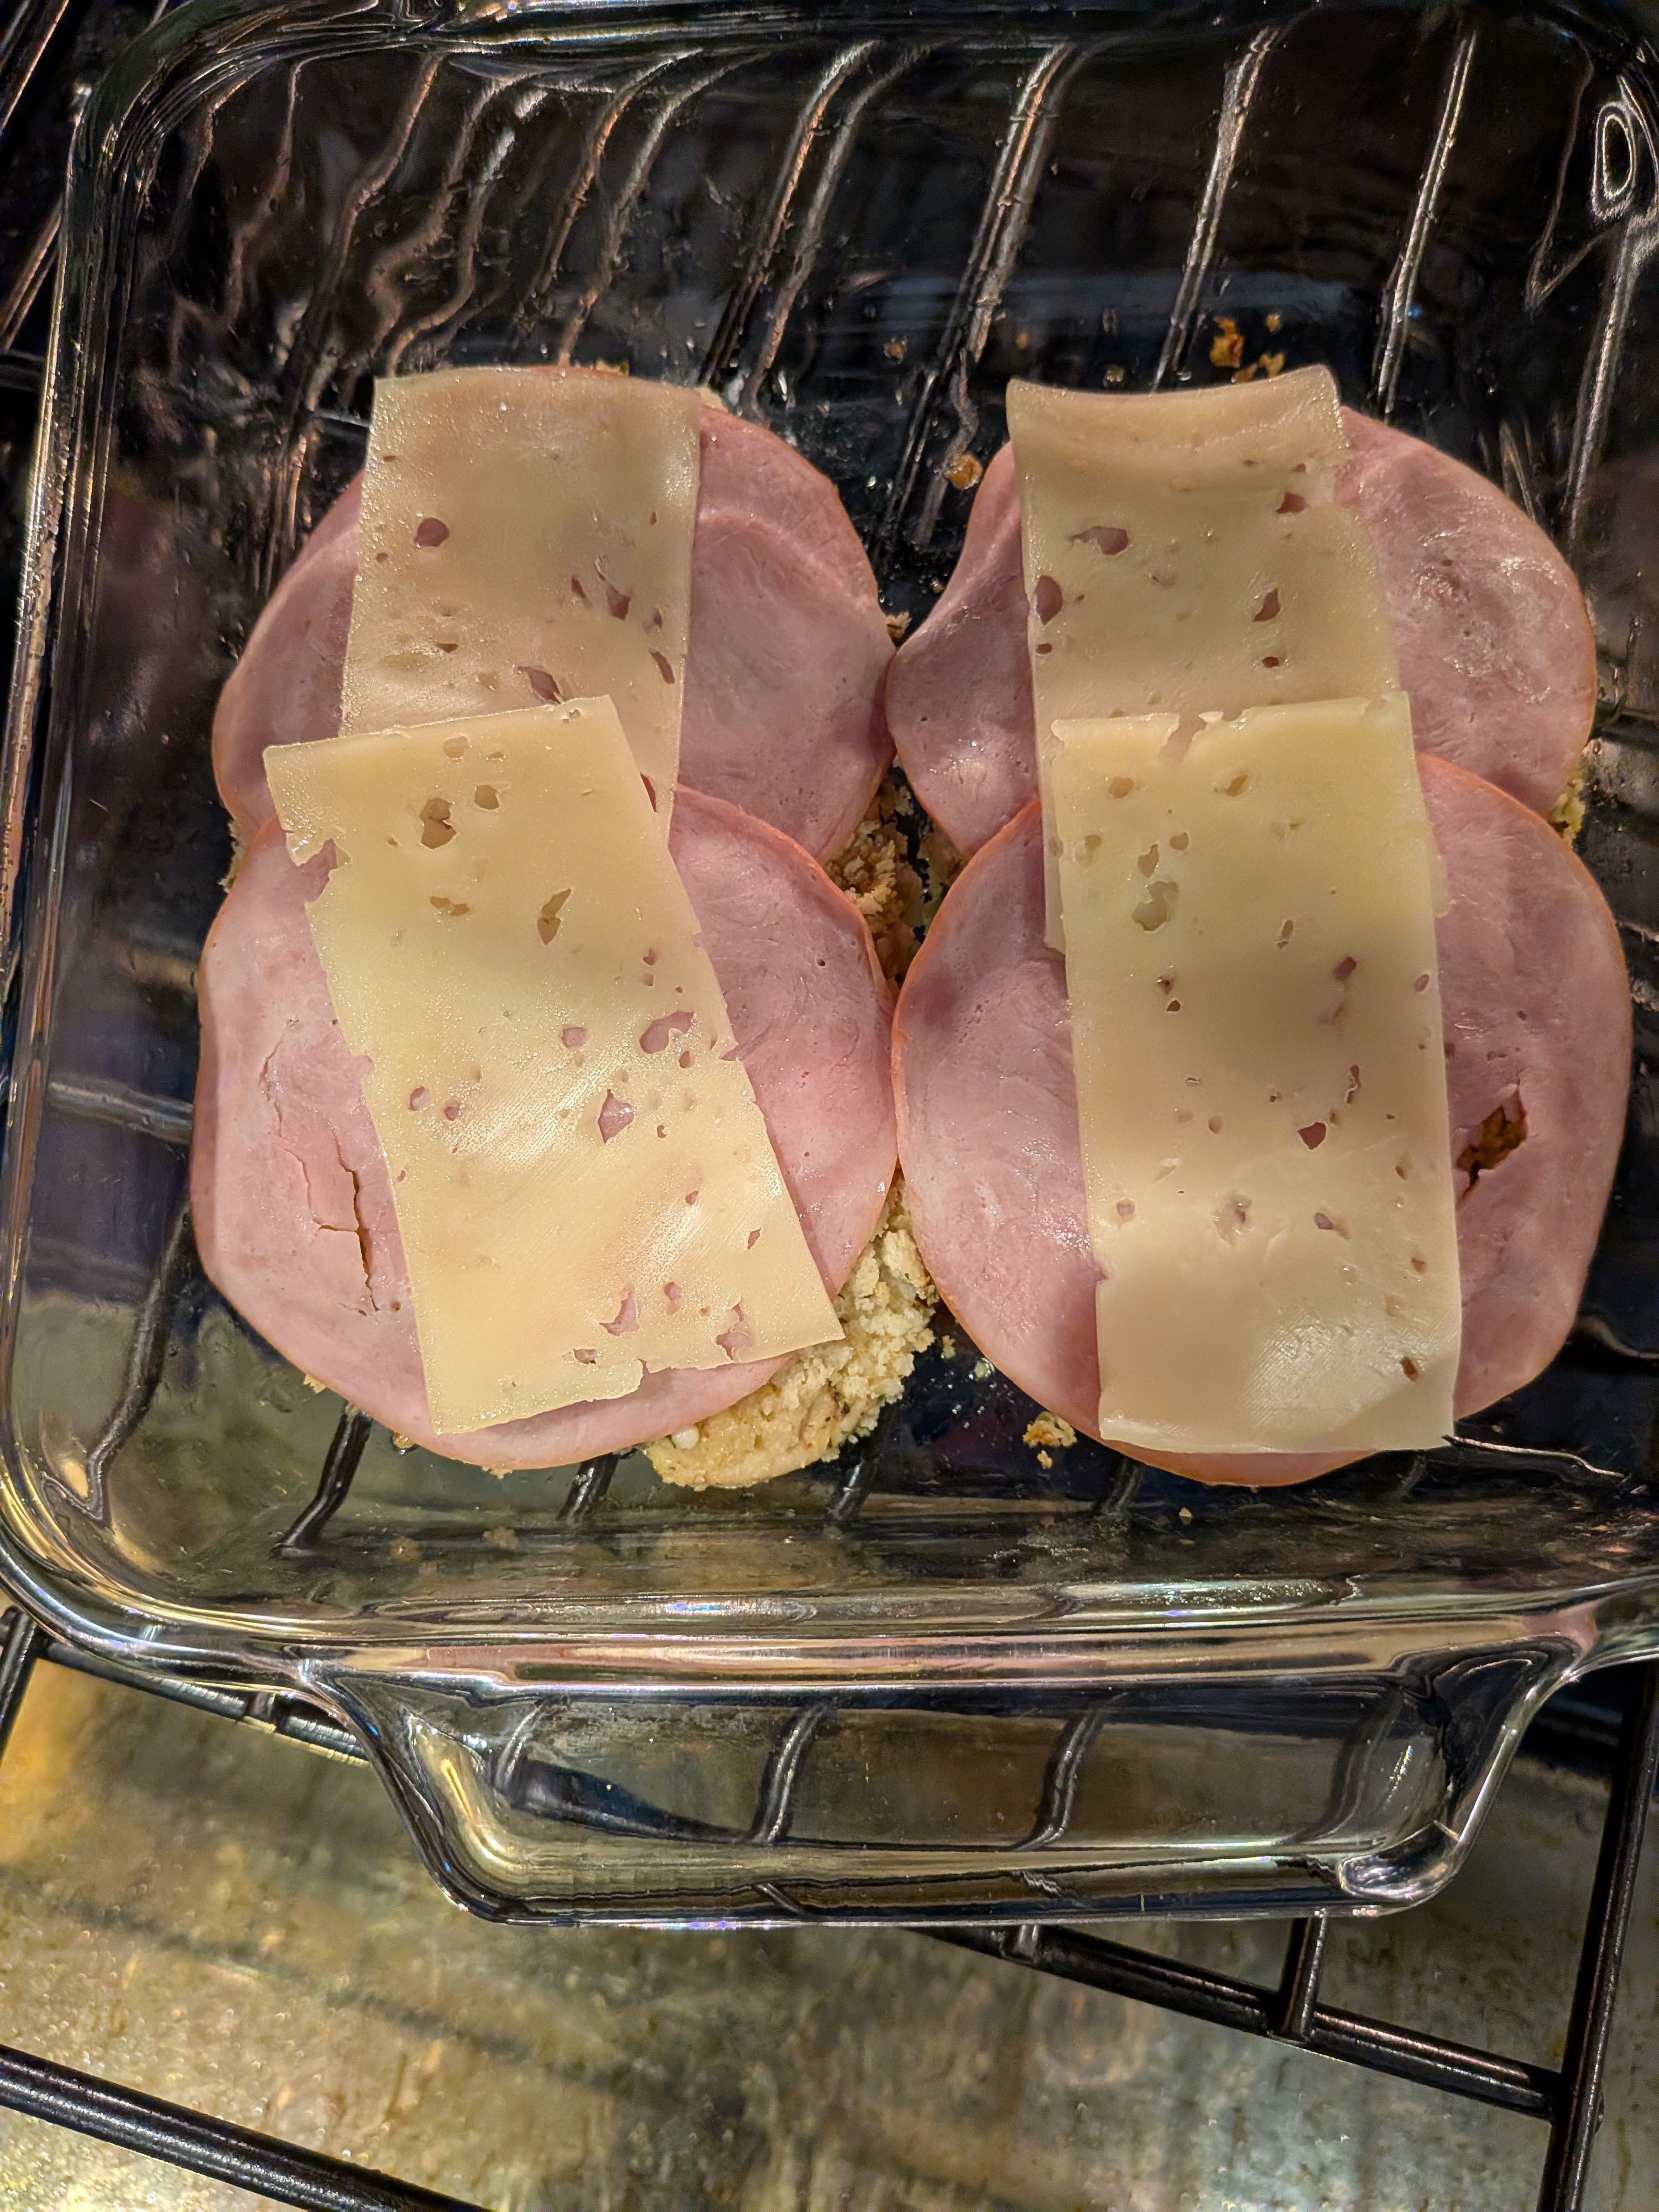
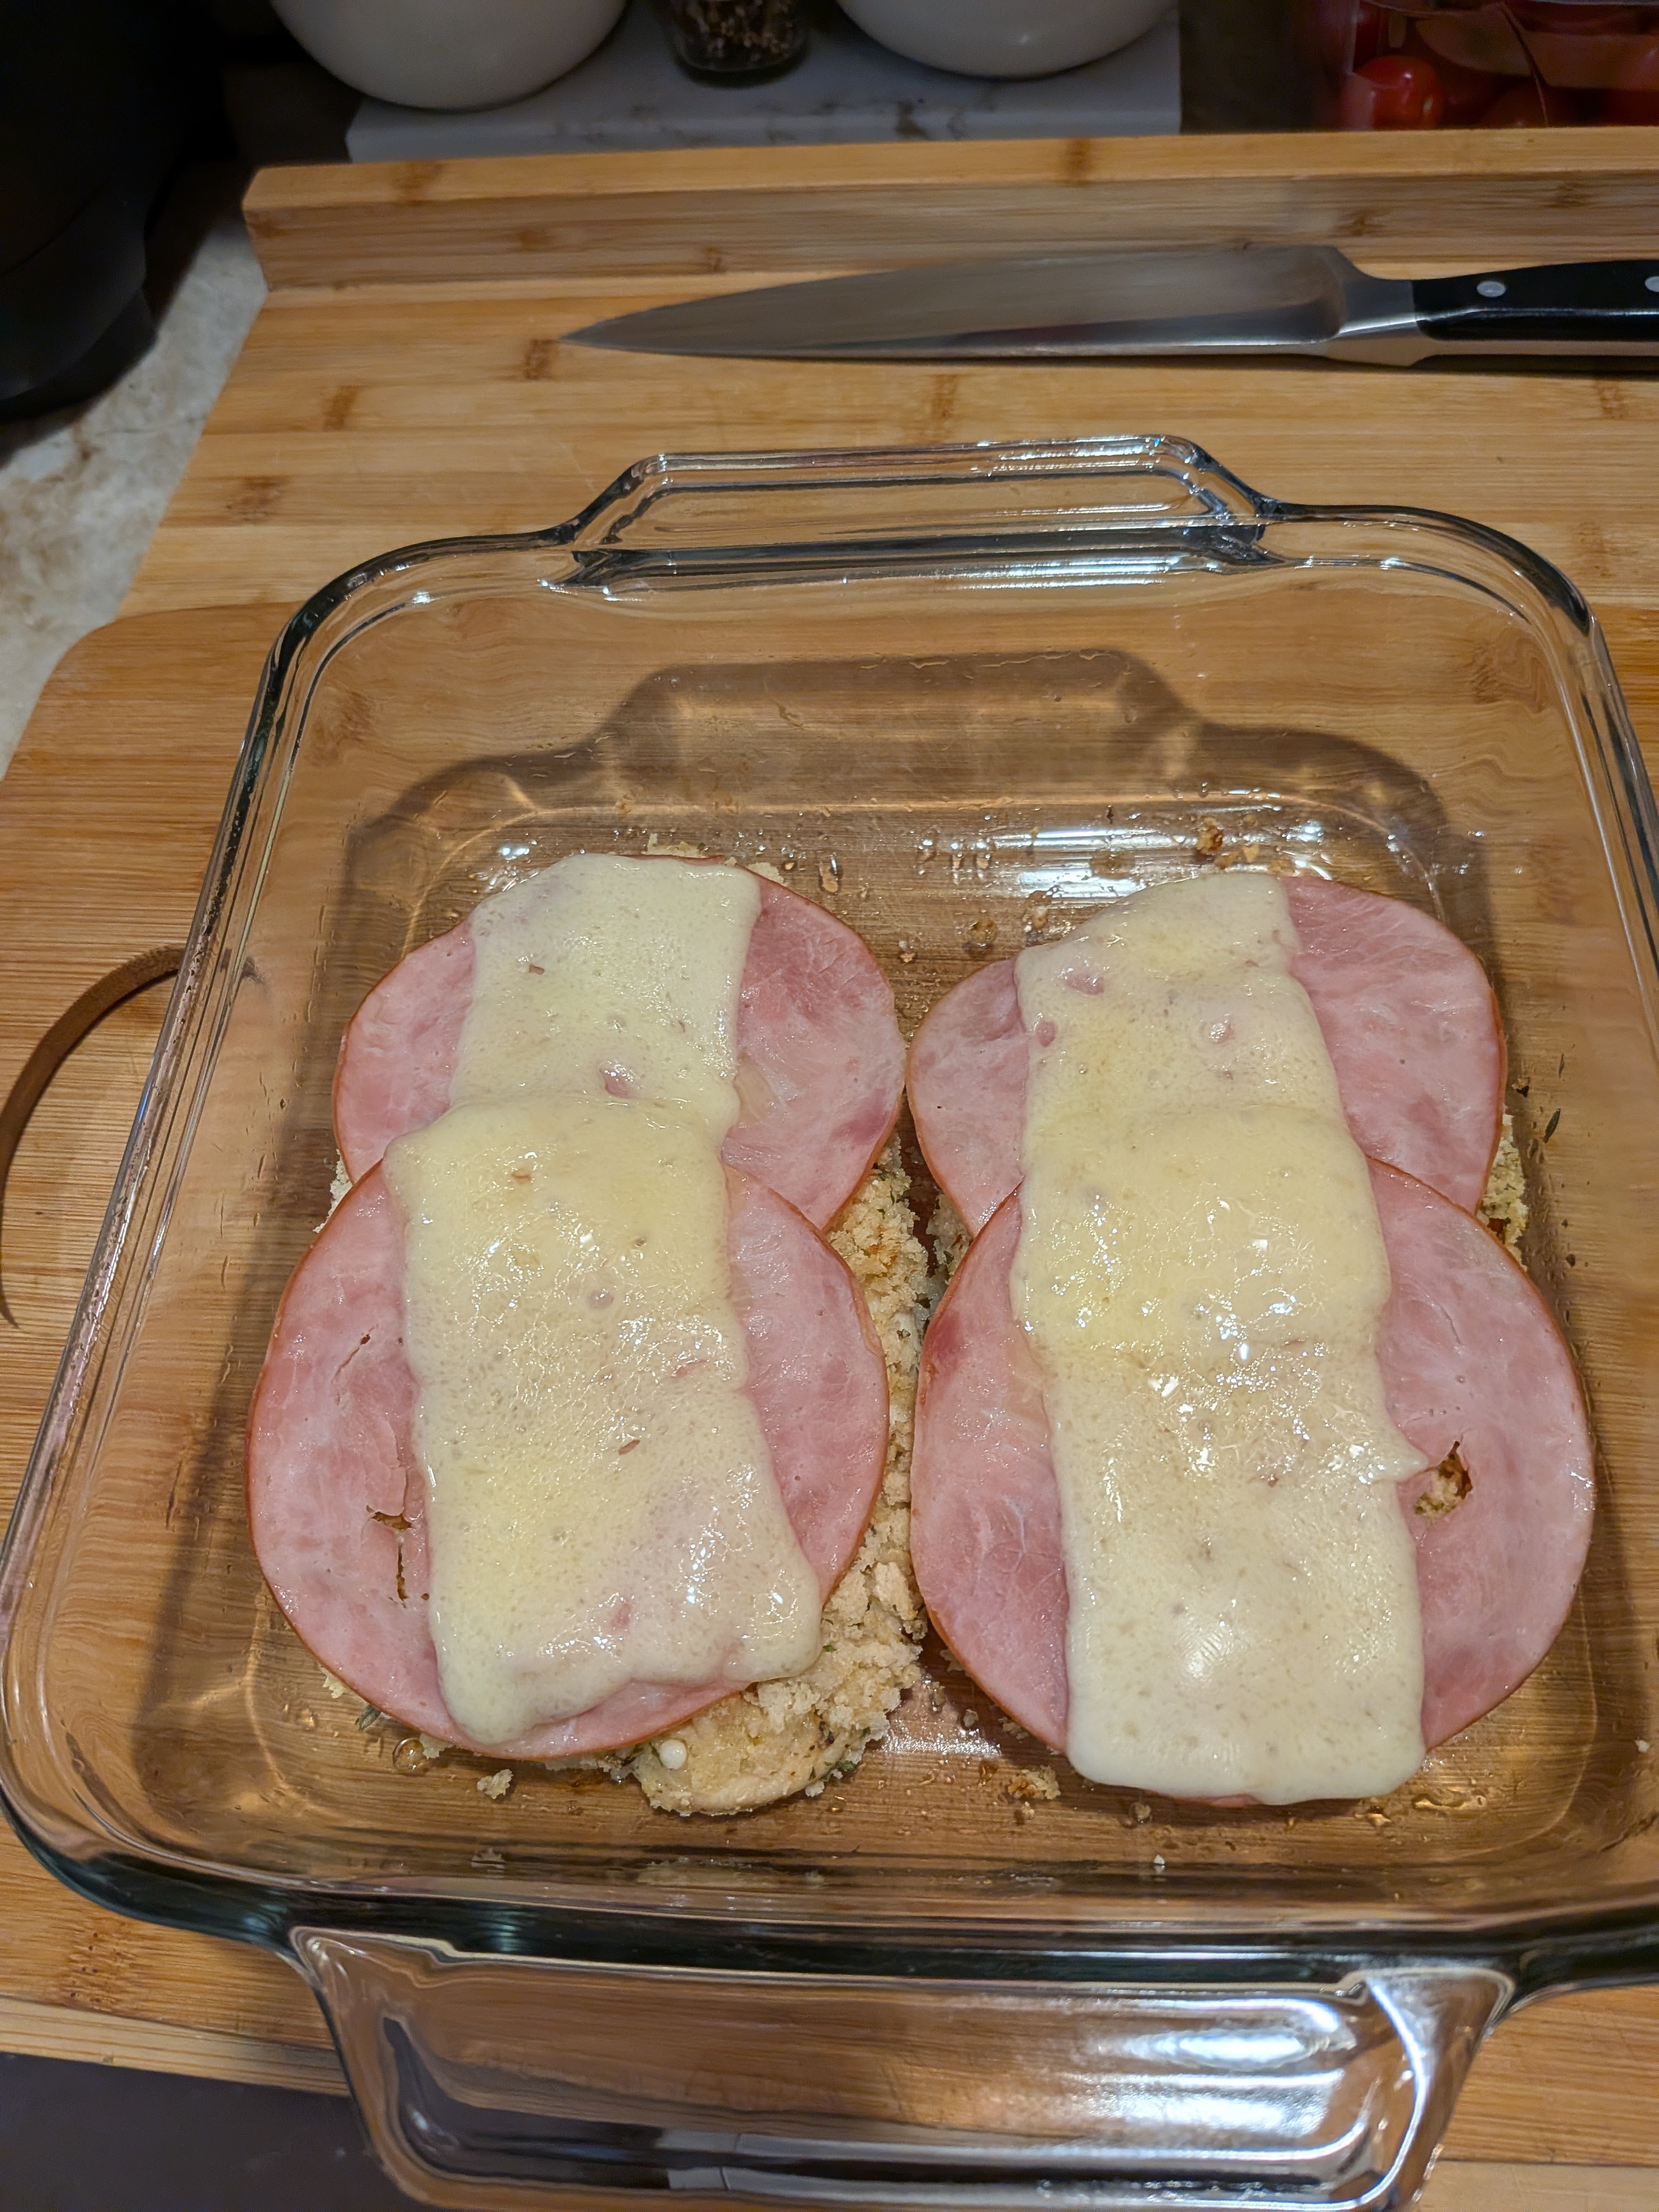
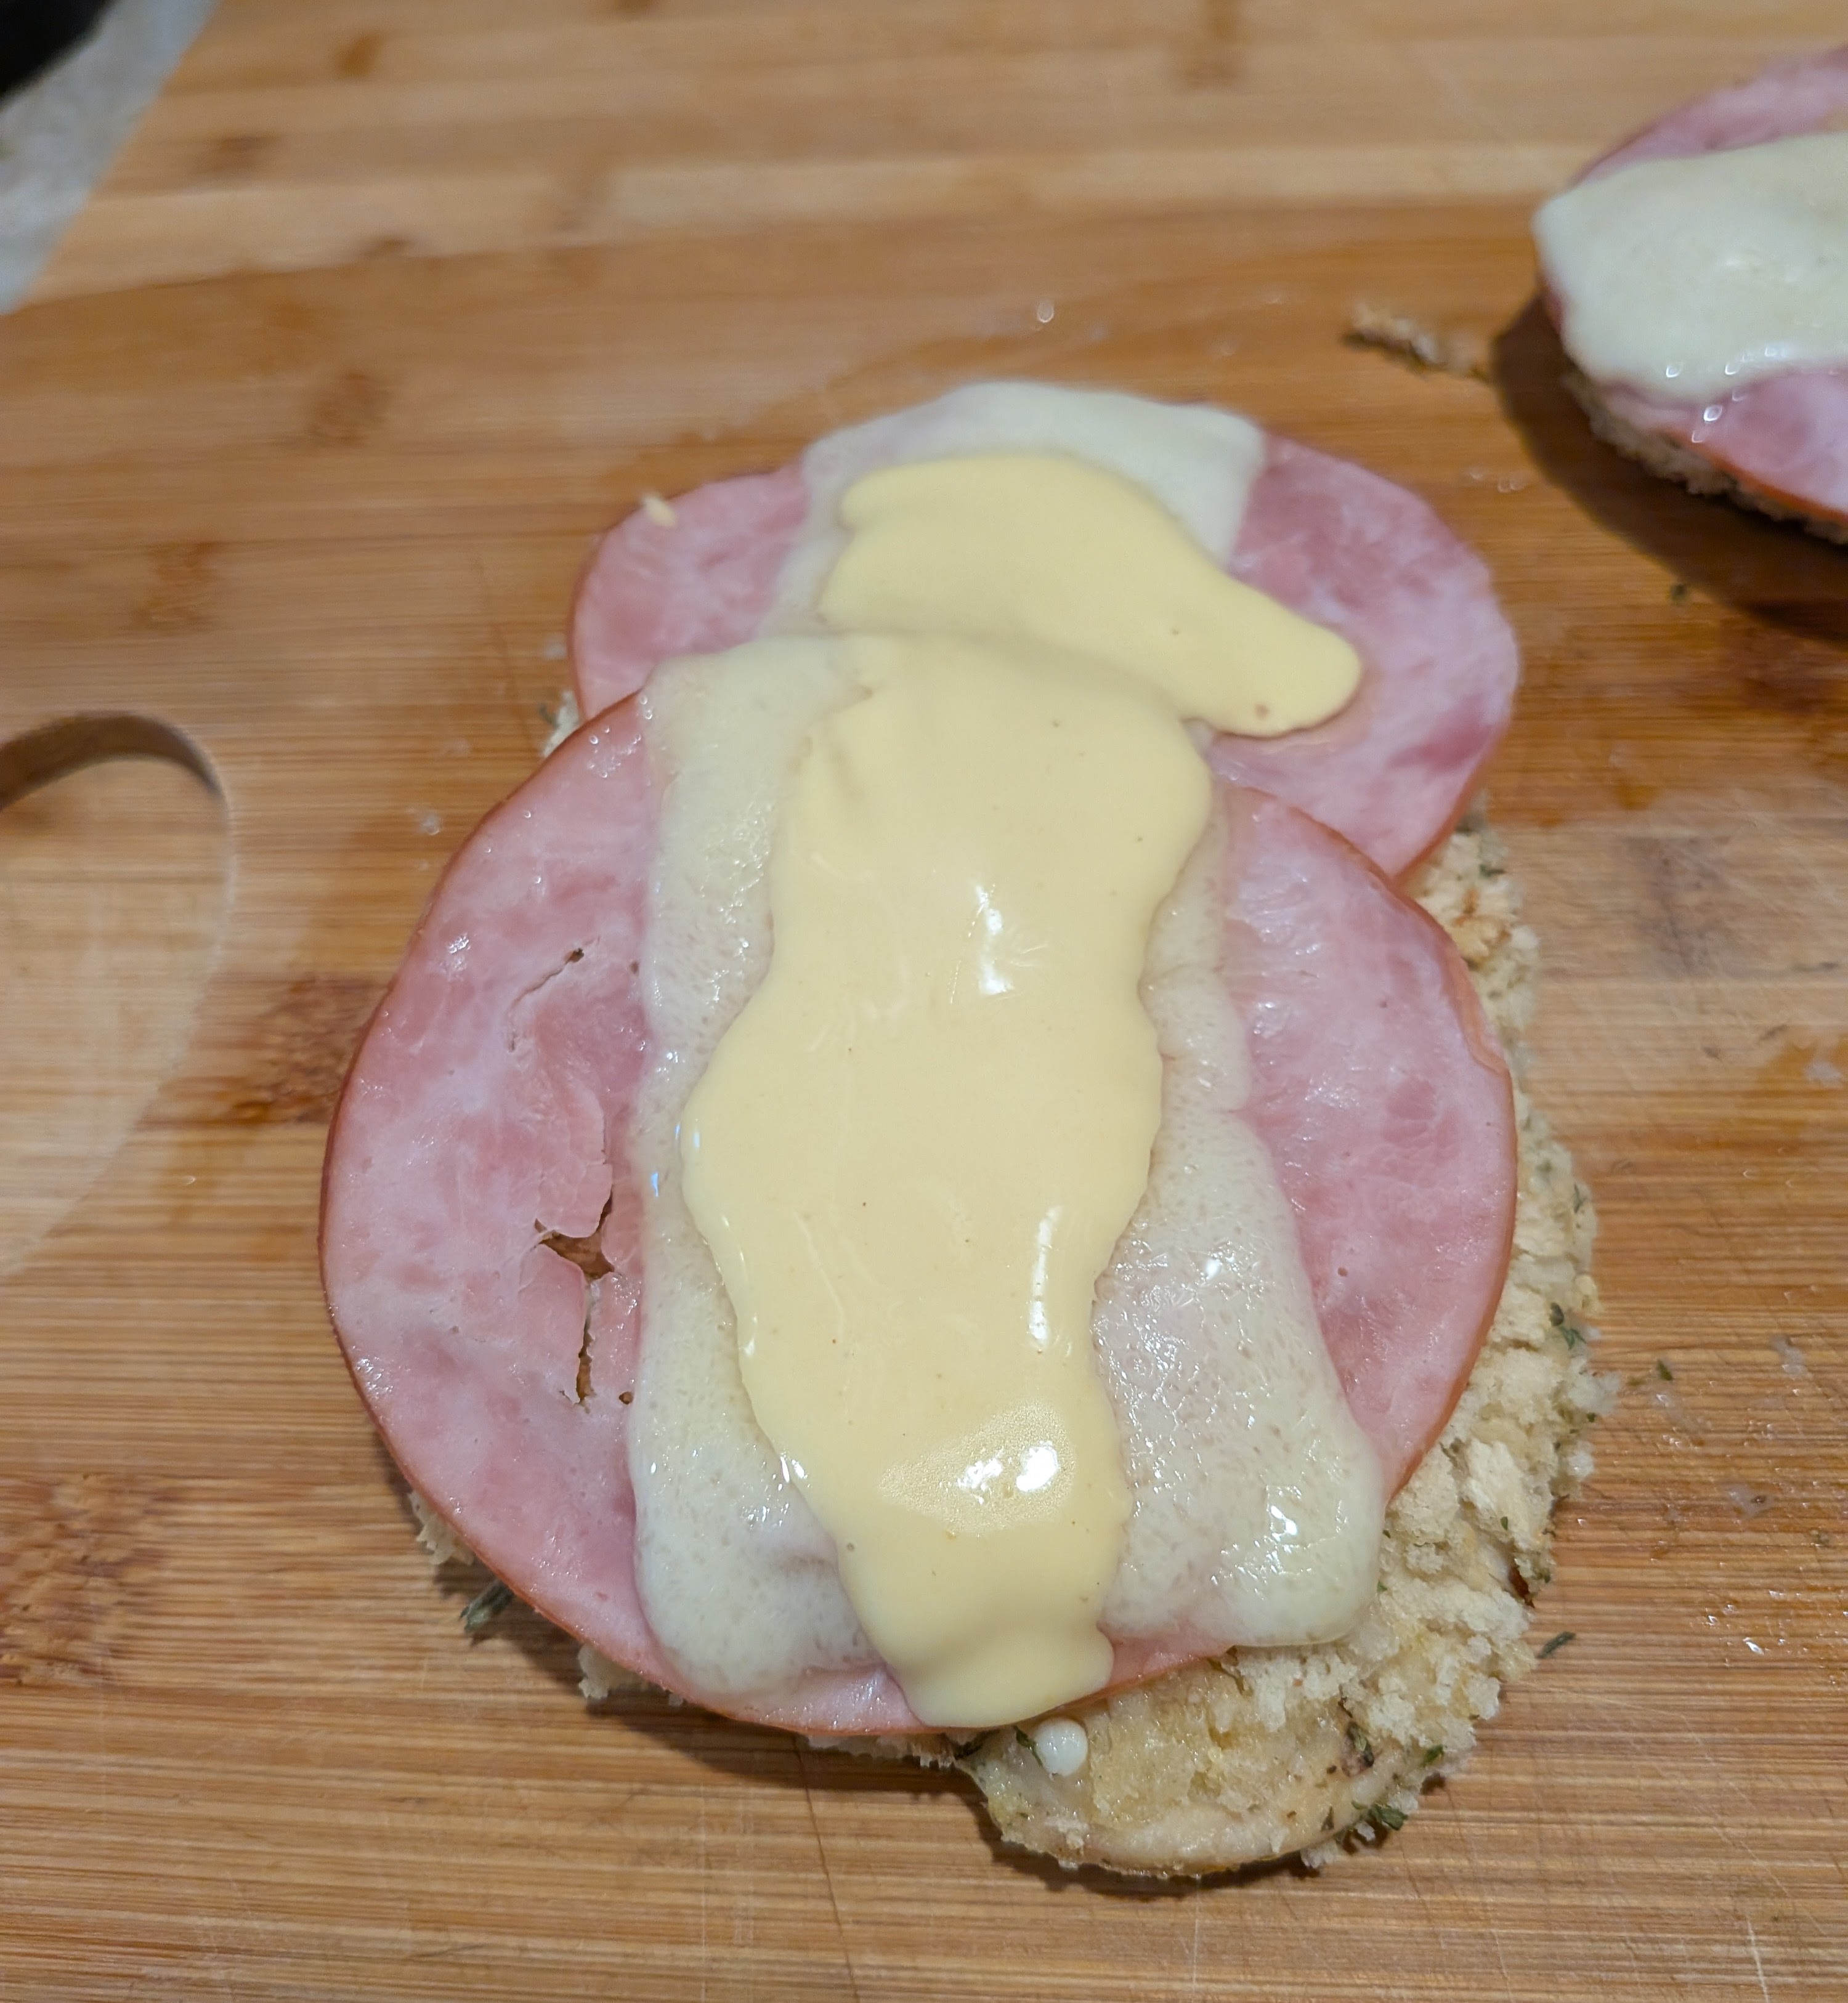
Add Ham and Cheese
Top each chicken piece with two slices of ham and a slice of Swiss cheese. Bake 5 minutes more or until cheese melts.
Make Sauce
For sauce, in a small bowl, whisk together mayonnaise, Dijon and yellow mustard, and honey. Serve chicken with sauce for dipping.
Wholefood had mild chicken sausage so we decided to try some since can’t find Davio’s in the stores but we’ll keep looking. I usually just make roasted vegetables but Lyn saw this in the globe so we gave it a try. We only did 1/2 recipe since there are only two of us. Will try again it’s great for what ever you have in the frig for veggies.
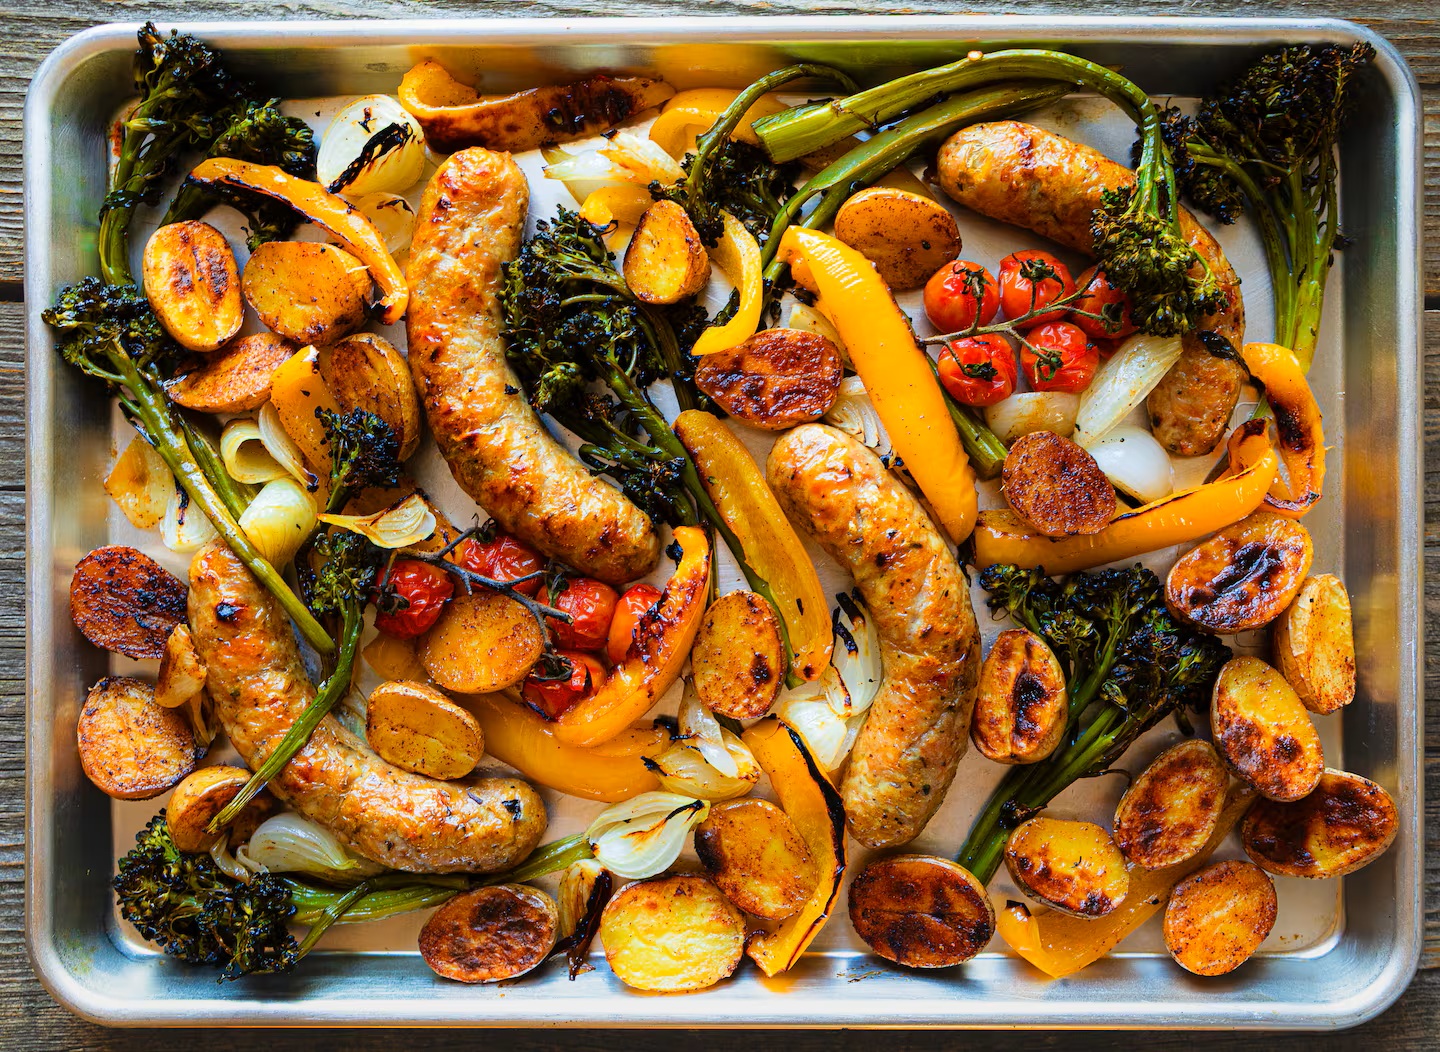
A sheet pan is a kitchen workhorse and your ticket to an easy weeknight. Use it to make a one-dish meal with minimal prep, layers of flavor, and streamlined cleanup. A typical sheet pan is a sturdy 13-by18-inch rimmed baking sheet, big enough to accommodate a variety of ingredients. Vegetables cooked on it at a relatively high temperature turn crispy on the outside with concentrated flavors. Chicken or turkey sausages are ideal companions to the vegetables, since they cook at about the same time. Give small golden potatoes a head start in the oven because they take a little longer than everything else. While they roast, prep broccolini, cherry tomatoes, yellow bell pepper, onion, and sausages. Make a few shallow slashes in the sausage casings so they don’t burst in the oven when they release steam. It’s a colorful meal that hands off most of the work to the oven.
1 pound baby golden potatoes, halved
¾ teaspoon Spanish smoked paprika (pimenton)
Salt and black pepper, to taste
4 tablespoons olive oil
1 bunch broccolini, ends trimmed
1 pint cherry tomatoes
1 yellow bell pepper, cored, seeded and cut into
1-inchwide strips
3 spring onions (golf ball-size bulbs), ends trimmed and bulbs quartered, or
1 medium yellow onion, halved and cut into thick slices
4 chicken or turkey sausages (about 1 pound), such as sweet or hot Italian sausage
1. Set the oven at 425 degrees. Have on hand a rimmed baking sheet.
2. On the baking sheet, spread the potatoes in one layer and sprinkle with smoked paprika, a few pinches of salt and black pepper, and 2 tablespoons of the oil. Toss to coat the potatoes. Roast them for 15 minutes.
3. Meanwhile, in a large bowl, toss the broccolini, cherry tomatoes, bell pepper, onions, a pinch each of salt and black pepper, and the remaining 2 tablespoons olive oil.
4. Make shallow cuts in the sausages on both sides in a few places.
5. Remove the potatoes from the oven. Arrange the sausages, broccolini, cherry tomatoes, bell pepper, and onions between and around the potatoes, keeping everything in one layer.
6. Return to the oven for 20 minutes, or until the sausages are cooked through and a meat thermometer inserted into the thickest part of a sausage registers 165 degrees. If the sausages have not browned enough, turn on the broiler and let the sausages and vegetables brown for 3 to 4 minutes. (Total roasting time is 35 minutes.)
7. Divide the sausages and vegetables among 4 plates.
This easy pasta salad recipe is flexible based on the ingredients you have in your kitchen or the season. Use a hearty pasta shape with nooks and crannies to hold onto the dressing, like rotini or penne. We love the fresh mozzarella balls and parmesan cheese, which melts into the dressing, and pepperoncini peppers add a tangy kick if you have them on hand.
Pasta Salad
1 pound dried pasta like fusilli, penne, rotini or farfalle
1 cup sliced bell pepper, 1 medium
1 cup thinly sliced zucchini , 1/2 medium
1 cup halved cherry tomatoes
1/3 cup thinly sliced green onions, 5 to 6 green onions
1/4 cup sliced pepperoncini or banana peppers, optional
1 cup (4 ounces) halved mixed olives
1 cup (2 ounces) grated parmesan cheese or other hard cheese
1 cup (6 ounces) fresh mozzarella balls, chopped
1/3 cup fresh parsley or basil, optional
Homemade Dressing
1/3 cup red wine vinegar, white wine vinegar, or champagne vinegar
1/2 teaspoon fine sea salt, plus more to taste
1/2 teaspoon fresh ground black pepper
1/2 teaspoon dried oregano
2 to 3 tablespoons juice from pepperoncini jar, optional
1/2 cup extra-virgin olive oil
Directions
1Bring a large pot of salted water to a boil. Add pasta and cook until tender, 6 to 10 minutes (check the package for recommended cook time). Drain and rinse well under cold water.
2While the pasta cooks, make the dressing in the bottom of a large bowl. Whisk the red wine vinegar, salt, pepper, oregano, pepperoncini juice (if using), and olive oil until blended. Add the drained and rinsed pasta to the dressing and mix well.
3Stir in the bell pepper, zucchini, tomatoes, scallions, pepperoncini (if using), olives, parmesan, mozzarella, and herbs (if using). Taste for seasoning and adjust with salt and pepper as needed. Serve, or for the best results, cover and refrigerate for at least 30 minutes and up to 5 days.
Adam and Joanne’s Tips
Storing: You can make pasta salad and keep it in the fridge for 3 to 5 days.
Make ahead: The extra time allows the flavors of the pasta, veggies, and dressing to meld together. I like making this salad the day before serving. I save a bit of the dressing separately in the fridge. Then, just before serving, I toss in the reserved dressing to refresh the salad.
The nutrition facts provided below are estimates.
NUTRITION PER SERVING: Serving Size 1/10 of the salad / Calories 363 / Total Fat 19.1g / Saturated Fat 5.1g / Cholesterol 18.3mg / Sodium 507.1mg / Carbohydrate 36.6g / Dietary Fiber 2.3g / Total Sugars 2g / Protein 11.7g
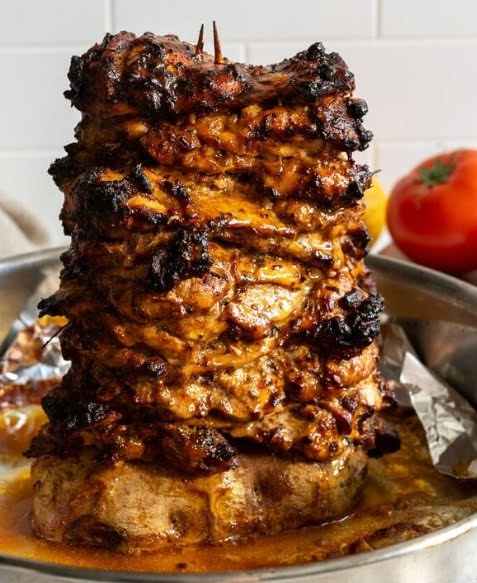
It’s the juiciest pork tenderloin you’ll ever make!
I’ve wanted to try cooking in air fryer, and this popped up. I decided to try something different, so I did a search and Pioneer Women recipe. I was kind of BBQ tasting next time I might use smoked paprika.
Ingredients
1 1/2 lb. pork tenderloin Note: mine was a smaller piece so I did not have to cut in half
2 tsp. kosher salt
2 tsp. light brown sugar
1 tsp. ground black pepper
1 tsp. dried thyme
1 tsp. paprika
1/2 tsp. garlic powder
1 Tbsp. olive oil
Directions
Remove the pork tenderloin from the refrigerator and pat very dry. Cut in half so that it will fit into the basket of a 6-quart air fryer.
In a small bowl, combine the salt, brown sugar, pepper, thyme, paprika, and garlic powder. Brush or rub the olive all over the pork tenderloin. Sprinkle the spice mixture all over, pressing it in to the pork tenderloin to adhere.
Place the two pieces in the basket of the air fryer with space between. Cook at 400°F for 10 minutes. Flip the pork tenderloin and continue cooking at 350°F for 10 to 15 minutes more, or until the internal temperature in each piece reaches at least 145°F.
Transfer the pork to a cutting board and let rest for 5 minutes before slicing and serving.
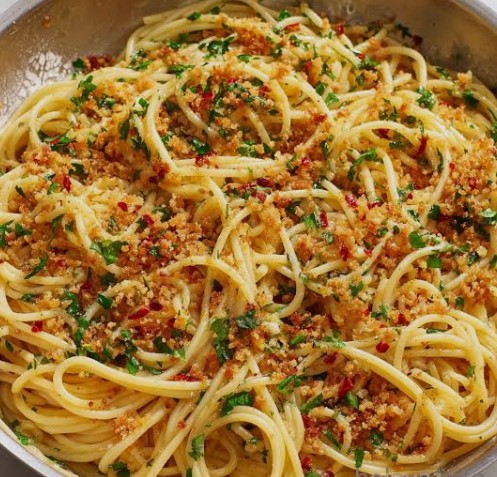
Want a quick meal that tastes great with or without the anchovy. I saw similar on Milk Street so I decided to give it a try but I had no anchovy. The pasta was the longest cooking in this recipe.
Ingredients
1 lb (500g) Spaghetti or Linguine
½ cup to 1 cup walnuts, roughly chopped
½ cup panko or rustic breadcrumbs (fresh is best)
½ cup extra virgin olive oil, divided
1-6 garlic cloves, minced
¼ cup chopped fresh flat-leaf parsley
¼ -½ tsp red pepper flakes (optional, for heat)
½ lemon, zested and juiced (optional)
½ cup grated Parmesan or Pecorino Romano cheese
A few chopped sun dried tomatoes (I soaked in the lemon juice)
Salt and black pepper to taste
Top with some more fresh grated cheese
Instructions
Toast the Walnuts and Breadcrumbs: In a large skillet or frying pan, heat 2 tablespoons of olive oil over medium heat. Add the breadcrumbs and chopped walnuts. Toast, stirring frequently, until the breadcrumbs are golden brown and the walnuts are fragrant (about 3-4 minutes). Remove from the pan and set aside in a small bowl.
Cook the Pasta: Meanwhile, bring a large pot of salted water to a boil. Add the spaghetti and cook according to package directions until al dente (usually 1-2 minutes less than the package says).
Create the Sauce: In the same skillet used for the nuts, add the remaining olive oil, minced garlic, and red pepper flakes. Sauté over low-medium heat for about 1 minute until the garlic is fragrant but not browned.
Combine: Before draining the pasta, reserve about 1 cup of the starchy pasta water. Add the cooked spaghetti directly to the skillet with the garlic oil.
Finish the Dish: Add half of the walnut-breadcrumb mixture, the lemon zest/juice (if using), and a splash of pasta water. Toss everything over medium heat, allowing the water and oil to emulsify into a light sauce that coats the pasta. Add more pasta water if it seems dry.
Serve: Turn off the heat and stir in the parsley and Parmesan cheese. Top with the remaining toasted walnut-breadcrumb mixture for extra crunch.
Serve: Turn off the heat and stir in the parsley and Parmesan cheese. Top with the remaining toasted walnut-breadcrumb mixture for extra crunch.
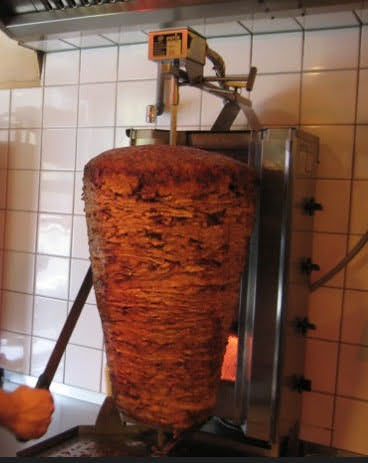
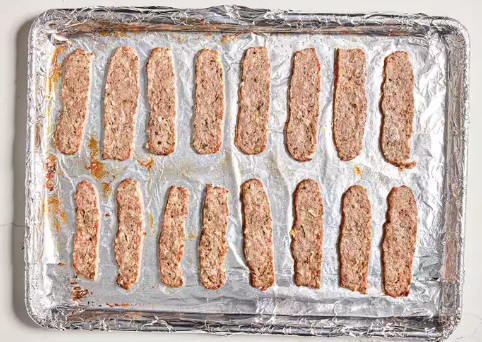
I got turned onto Gyros when i lived in Chicago, thinly sliced meat that was flame broiled on a screwier.
I bought a Gyros pan pictured on left. I’ve done it with chicken and beef and both came out pretty good. The chicken was a killer smelling it while it cooked.
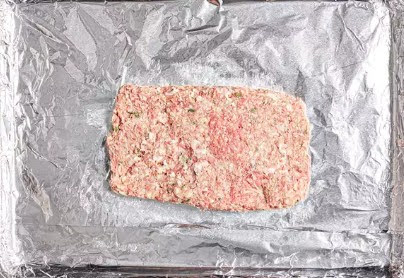
Ingredients
For the Meat:
1 pound ground lamb (Lean is preferred)
2 teaspoons kosher salt (or 1 teaspoon table salt)
1/2 teaspoon freshly ground black pepper
1/2 teaspoon dried or 2 tablespoons fresh oregano leaves
1/2 medium onion, cut into 1-inch chunks
1 clove garlic, sliced
For the Yogurt Sauce:
3/4 cup plain, unsweetened yogurt
Peeled seeded cucumber, minced
1 clove garlic minced or through press
2 teaspoons juice from 1 lemon
2 tablespoons chopped parsley or mint or dill
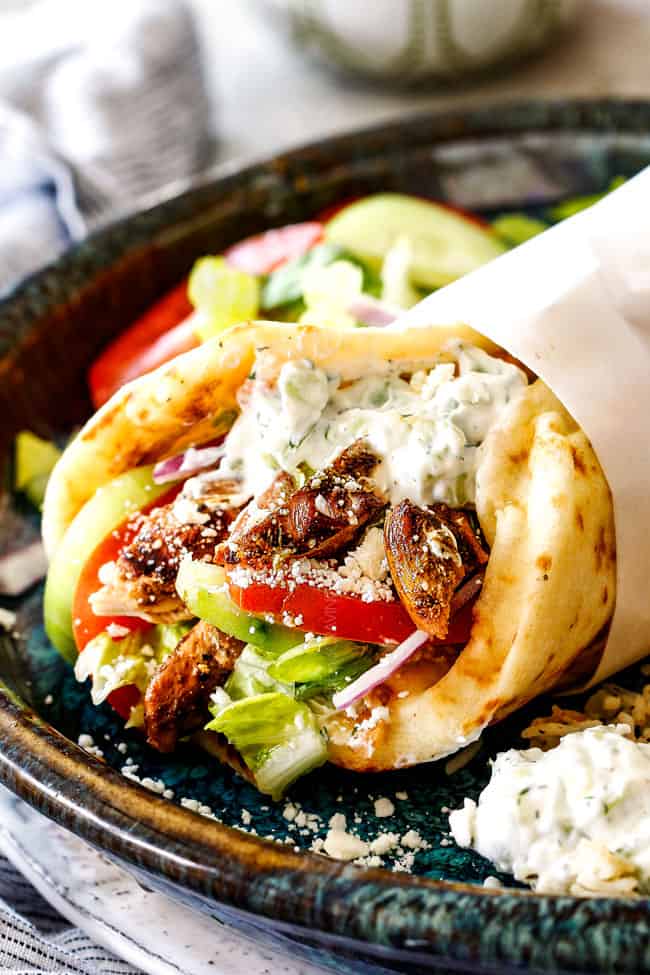
To Serve:
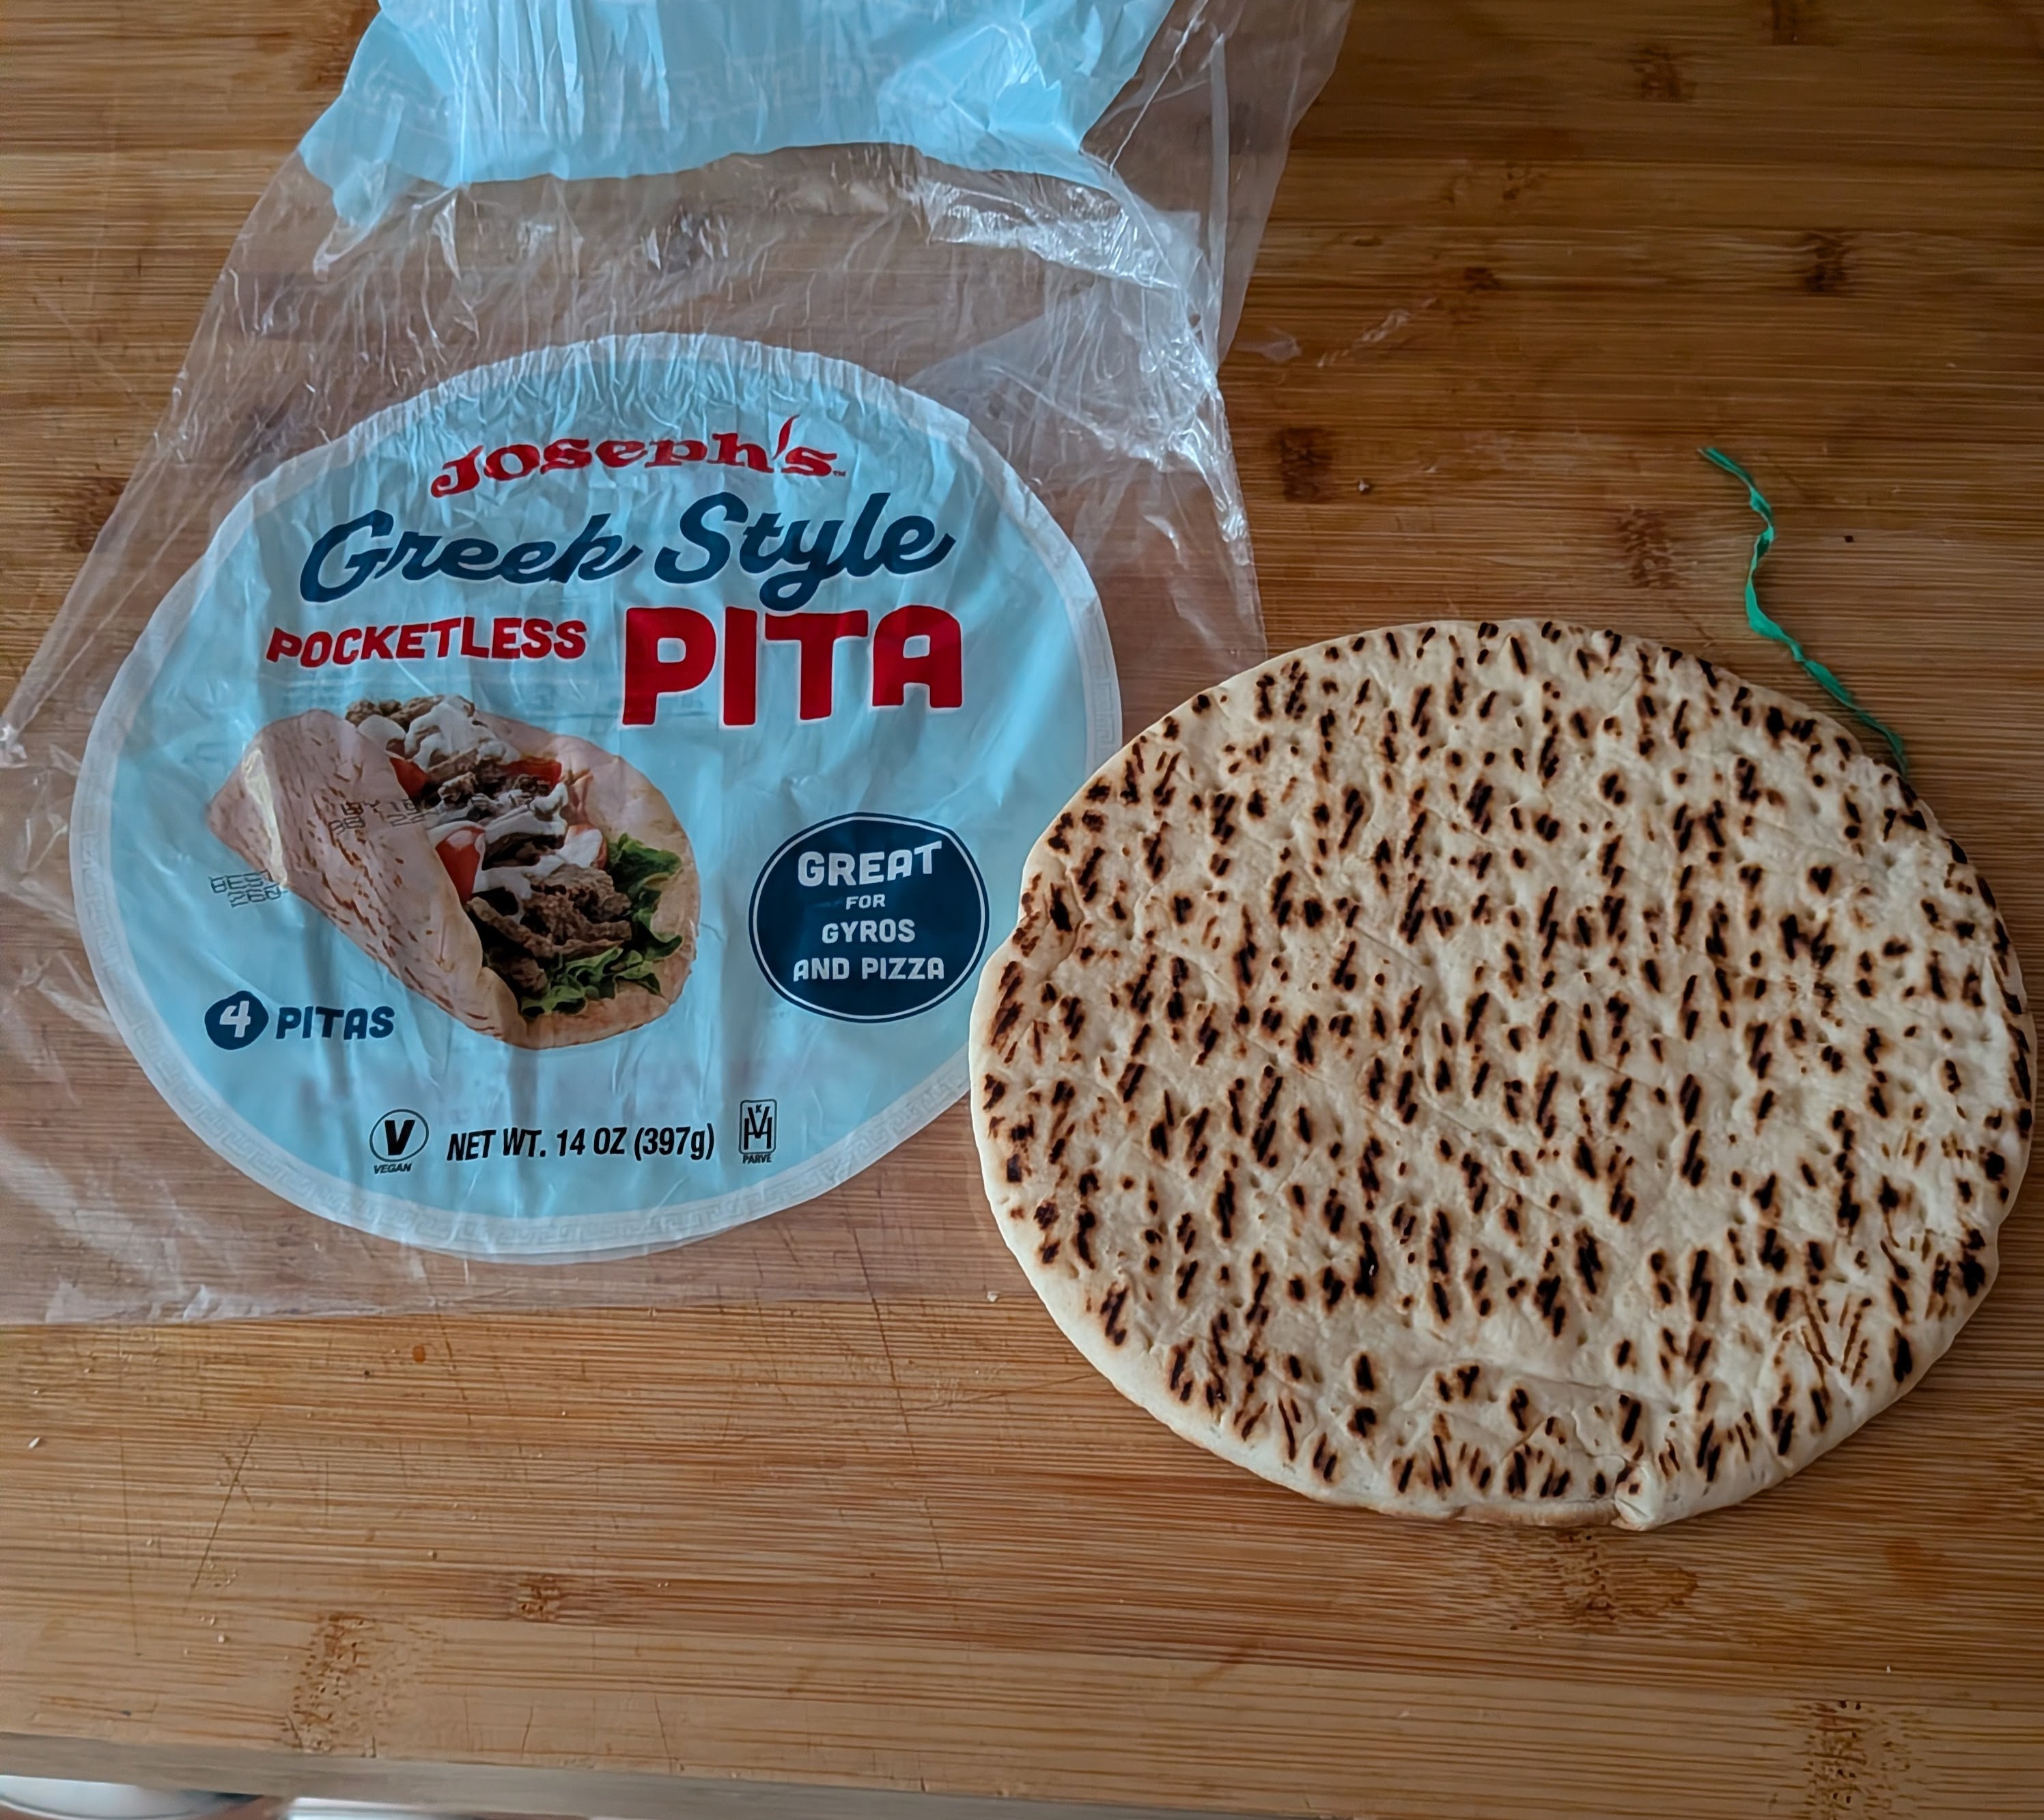
4 pieces soft, Joseph Greek Style pocketless pita)
Chopped fresh tomato
Finely sliced onion
Cubed peeled seeded cucumber
Shredded lettuce
Directions
Combine lamb, salt, pepper, and oregano in a medium bowl. Mix with hands until homogeneous. Cover and refrigerate at least 1 hour or up to overnight. Meanwhile, place yogurt in a fine-mesh strainer set over a small bowl. Allow to drain in refrigerator for 1 hour. Adjust oven rack to middle position and preheat oven to 300°F (150°C). Place cold lamb mixture in bowl of food processor with onion, garlic, and bacon. Process until smooth a purée is formed, about 1 minute total, scraping down sides with rubber spatula as necessary.
Line rimmed baking sheet with aluminum foil. With moist hands, form meat mixture into rectangles about 1 1/2-inches high, 8-inches long, and 5-inches wide. Bake until center of loaf reads 155°F (68°C) on an instant-read thermometer, about 30 minutes. Allow loaf to rest at room temperature for 15 minutes (or refrigerate for up to a week, see notes).
Meanwhile, make the sauce. Combine strained yogurt, mayonnaise, garlic, lemon juice, and parsley and stir to combine. Season to taste with salt. Refrigerate, covered, until ready to use.
Adjust broiler rack to highest position (about 1 1/2 to 2 inches from broiler element) and preheat broiler. Slice loaf crosswise into 1/8 to 1/4-inch strips (each strip should be about 5-inches long and 1 1/2-inches wide). Lay strips on rimmed baking sheet lined with aluminum foil and broil until edges are brown and crispy, about 2 minutes. Tent with aluminum foil. Warm bread by placing on rimmed baking sheet and broiling until soft and pliant, about 45 seconds per side.
Spread some sauce over each piece of bread. Divide meat evenly between sandwiches. Top as desired, wrap with paper or foil, and serve. Some places serve with French fry but I’m a traditionalist those go on the side or maybe a Greek salad instead


")